We are bringing some series of articles for you. The articles will be discussing that, how you can deploy different parts of Storage concentrator. The previous article discussed about the volume encryption keys restore in USB drive. This article will be guiding you about the new section that, how you can configure and copy volumes in SAN storage.
How to Configure a SAN Volume
The General Configuration screen allows you to view and edit the following settings:
Logical Volume Name: System name of the volume
Volume Notes: Descriptive notes about the volume
Volume Control: Settings that allow you to put the volume online or offline
iSCSI Target Name: To change the iSCSI name of the volume.
To edit Volume Configuration, use the steps that follow:
1 Select Volume Management
2 Select Volume Configuration
3 Select General Configuration
4 Select the Volume you wish to edit from the drop down menu.
5 Edit the settings as desired.
♦ Click Undo to revert to the saved settings.
6 Click Submit
♦ The Volume Configuration screen will change depending on the volumes that have already been created. The drop down menus will offer the volumes that are available
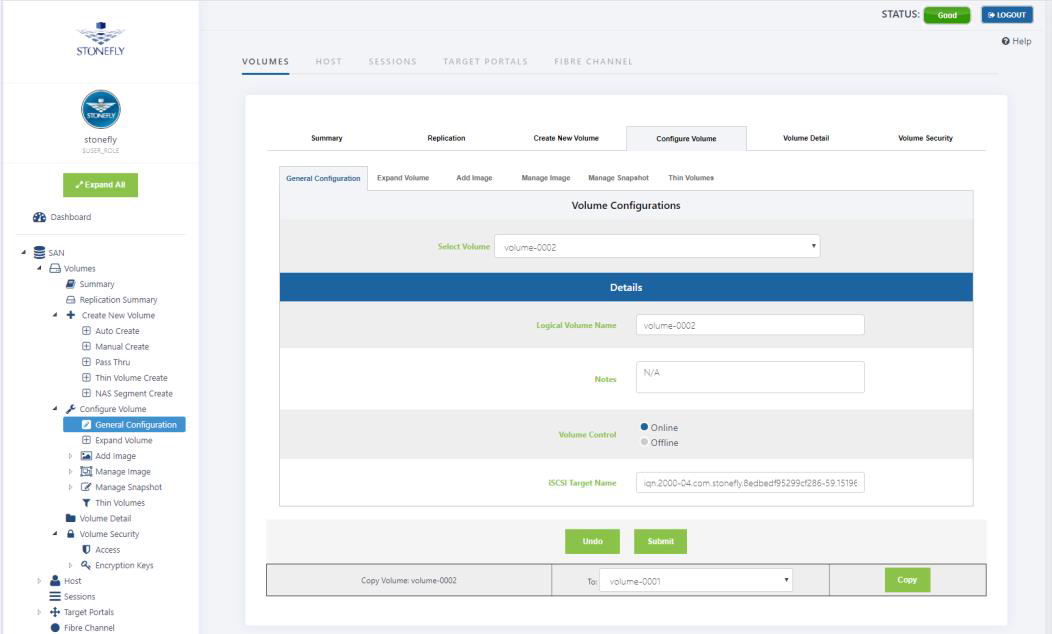
Copy Volume
The Copy Volume function makes an exact copy of a spanned volume, a mirror volume, a pass-thru volume, a thin volume, a deduplicated volume or a Snapshot Live Volume on Stand Alone or Cluster of One Storage Concentrators. For Clusters of Storage concentrators the copy can be executed for spanned and pass-thru volumes only. The copy destination must be the same size or larger than the original. This function is primarily designed to create duplicate volumes for disaster recovery or data distribution. You may run up to five (5) copies of any volumes simultaneously.
To use the copy volume function, you must first create a destination volume of the same size or larger using the Create Volume Function (see section: “Creating a Volume”). Once the volume is created, you will need to copy from the original volume to the destination. If a destination volume of an appropriate size has not been created, the Copy Volume function will not display.
- Select Volume.
- Click on Volume Configuration screen (as shown above).
- Select the Volume you want to copy from the pull down menus at the top of the screen.
- Select the Volume you want to copy to from the pull down menu next to the Copy Button. Only eligible volume selections will appear in this menu.
The volume you are copying from must be “Online” to be able to copy from it. Offline volumes are not available to copy. There must be no hosts logged into the source or destination volumes, and they remain inaccessible to hosts during the copy.
Volumes enabled with encryption are not eligible for the Volume Copy feature. A volume must be copied by performing the copy at the host level to insure the encryption is performed properly. The process includes:
- Identify the volume to be copied.
- Create an encrypted volume to receive the data. The volume must be at least as big as the original volume. If encryption is desired on the copy it must be chosen at the time the copy is created. The system cannot guarantee the use of the same encryption key on both the original and the copy.
- Mount the copy volume on the server and use a function of the host operating system to copy from the original volume to the copy volume.
- Click Copy. The system will display the following message:
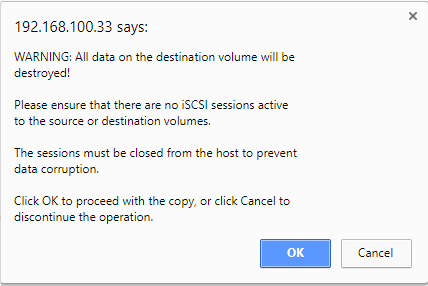
- Click OK if you have already logged out all host sessions. If you have not logged out all host sessions, click Cancel.
This is the conclusion for the configuration volume section. The next article will be discussing that, how you can expand volumes in SAN. If you still have any queries or questions, feel free to contact our experts and professionals.
")
")